Creating Projects via My Workspaces
You can easily drag and drop files to any subscribed folder in My WorkspacesWorkspaces is a configurable zone at the top of the left-side Navigation Panel. It starts out empty and then gains listings as you “subscribe” to available bookmarks and profile group links. Workspaces makes it easy to focus on items of particular interest, and ensures that access to these items if quick and easy. Views and projects (if any) available for subscribed bookmarks and links display automatically under WorkSpaces listings.Items can display in Workspaces under these circumstances: A location is bookmarked. Any bookmarked item can then be subscribed to, via right-clicking on My Workspaces in the left-side path tree. Subscribing is the process of publishing the bookmark to the My Workspaces zone. Note: This is a separate action from pinning bookmarks. A cabinet is “Project Folder” enabled. This is done via an option (Properties) settings in the WDADMIN Edit > Cabinet dialog. Cabinets enabled this way appear automatically as subscription links on the My Workspaces right-click menu. to create a project.
Open Workspaces. If Workspaces is not visible in the navigation panel, click in the lower part of the panel.
Open the file list you need.
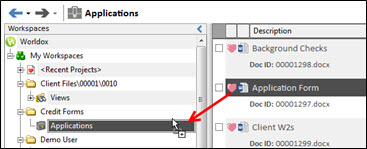
When the file list opens, highlight (select) one or more listed files. Hold the mouse button down and drag these files to a destination folder in My Workspaces. As you near that folder, the mouse cursor changes to indicate files can be dropped:
Release the mouse button to drop those files. That opens the Create Project dialog, which references the destination folder, and prompts you to name the project.

Name the project, then click OK to save it.