![]()
Set Worldox Preferences for the Send to ShareFile Feature in the Worldox INI File
Emailing Files with the Citrix ShareFile Connector
Notes about Emailing Files with the Citrix ShareFile Connector
Set the Password Preference for the Send to ShareFile Feature
You can use the Worldox Citrix ShareFile Connector to export files to ShareFile and send clients a link via email so they can download files from the ShareFile system. Files are safeguarded in ShareFile and downloads are encrypted for security purposes. For details, see Emailing Files with the Citrix ShareFile Connector.
![]()
Your Worldox administrator can edit preferences for the Send to ShareFile feature in the Worldox.INI file located in your network’s WORLDOX program folder.
Note: The SavePasswords preference described in this section is applicable to both the ‘Send Files via Email’ and ‘Add to the Extranet’ options. All other settings in this section pertain to the ‘Add to the Extranet’ option.
The ShareFile section of the INI file has the following preferences:
• SavePasswords=0
0 (Default value) = Users must enter a password when the Authenticate User dialog appears before sharing files. This is the default and recommended setting because it is more secure.
1 = The password is saved so that users do not have to enter a password before sharing files. Please note that if a user is not required to enter a password each time, it means that anyone with access to that user’s PC or device can use the ‘Send to ShareFile’ feature.
• You can change the default values for the following keys to grant or deny folder permissions:
• Download=1
• View=1
• NotifyUpload=0
• NotifyAddUser=0
• Upload=1
• Recursive=1
• Admin=0
• Delete=1
• Get=1
• NotifyDownload=0
![]()
Note: Sending files via an email link is useful for quick secure transmission of files, but may not be suitable for repetitive collaboration with clients or other third parties. If this is the case, use the extranet option. For details, see Setting up the Citrix ShareFile Extranet.
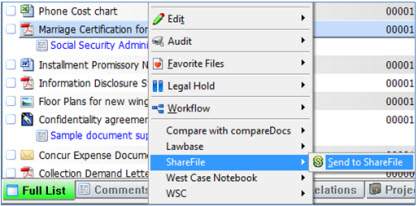
1. Right-click a file in Worldox and select ShareFile > Send to ShareFile.
2. The WDSHAREFILE GX3 – Send File to ShareFile dialog appears.
3. You can change the Subject from the default (for example, “Emailing 1 file”) to anything you like

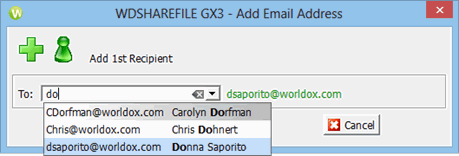
4. Click Add Recipient. The Add to Address dialog appears.
5. Type an address in the To field and select Done. You can also click the drop-down button to select an email address from your Contacts list.
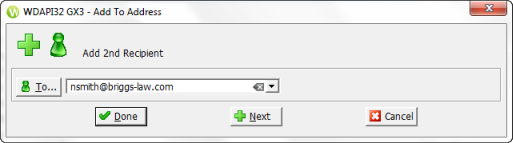
The email address is added to the Send File to ShareFile dialog.
Optionally, click Add Recipient to add another address.
6. Enter a Subject for the email. This is mandatory.

7. In the Body field box, you can type text to use in the email. This is optional.
8. You can click Expires after? to choose the number of days before the email expires. The default is 30. There is no maximum number to set for this option.
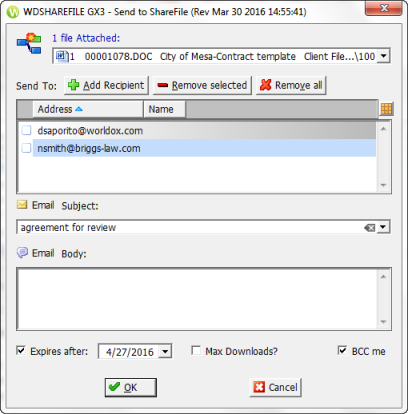
9. You can also select Max Downloads to specify the maximum number of times to download the file. The minimum is 0. The default is 99.

10. You can select BCC me if you would like to receive a duplicate copy of emails that you send to other users.
Note: All email addresses that are displayed in the Address field box will have access to the shared files. You do not have to highlight the address or check a box next to it before you select Send. You can use highlighting and the Remove Selected option to selectively remove users. You can also check Remove All if necessary.

11. Click OK to share the file with all the email addresses listed in the Email Address field box.
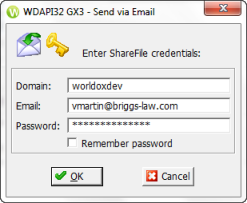
12. Re-enter your password and select OK.
13. Progress messages appear while a folder is being created, Citrix ShareFile is being connected and the link is sent.
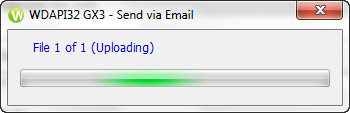
14. A dialog confirms that the file was uploaded successfully.

15. Click OK.
16. The recipient receives an email message with a link to the document you shared.
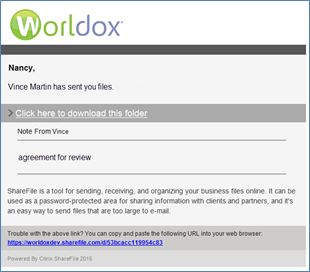
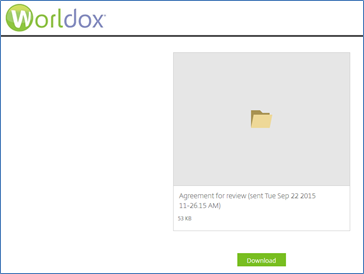
17. The recipient can click the link in the email to view the ‘Download’ page. Click the file name or the Download button to download the file.
![]()
• You are not limited to sharing files with only the contacts in your Outlook Contacts list. You can type the email address of any recipient in the To field.
• If the full email address appears in green to the right of the To field as you type, it indicates that the address has already been validated.

• If you entered an email address of a recipient that is not saved in your email program’s Contacts list, a message states, “No contact defined that begins with: address.” This is not an error and you can still send an email to that address. The message simply indicates that the email address is not in your contact’s list. The To drop-down list displays contacts that are saved in your email client’s contact list.
• The drop-down list of email addresses that auto-populates the To field as you type is enabled by MAPI, so in most cases if you are using Outlook, information is pulled from your Outlook contacts list. However, if MAPI is not configured for your site, the drop-down pulls email addresses from the Email Codes section of your personal Worldox User INI file. This essentially creates a contacts folder based upon everything you have profiled into Worldox using email. This new behavior (pulling emails from your personal Worldox INI) will always happen when customers are using the ShareFile connector via Worldox GX3 Cloud, because MAPI cannot be initialized via Published App technology. Remember that no matter how this drop-down populates, you can always manually type email addresses at any time.
• If a user’s Personal Folder is not found in the ShareFile extranet, a folder with the name of the user’s email address is created at the extranet root path as part of the upload process. The Done button in the Add Email Address will also be inactive, unless there is text inside the To field’s combo box.
![]()
Your Worldox administrator can edit the SavePasswords preference for the Send to ShareFile feature in the Worldox.INI file located in your network’s WORLDOX program folder.
Note: The SavePasswords preference described in this section is applicable to both the ‘Send Files via Email’ and ‘Add to the Extranet’ options. For details about other preferences that you can set for the ‘Add to the Extranet’ option, see Set Worldox Preferences for the Send to ShareFile Feature in the Worldox.INI File.
The ShareFile section of the INI file has the following preference:
• SavePasswords=0
0 (Default value) = Users must enter a password when the Authenticate User dialog appears before sharing files. This is the default and recommended setting because it is more secure.
1 = The password is saved so that users do not have to enter a password before sharing files. Please note that if a user is not required to enter a password each time, it means that anyone with access to that user’s PC or device can use the ‘Send to ShareFile’ feature.
![]()