![]()
If you have an older version of the Fujitsu ScanSnap application, the WorldoxProfileMaker.exe may not be able to add the Worldox Profile to the ScanSnap Manager program. If this is the case, then you can add the profile manually as follows:
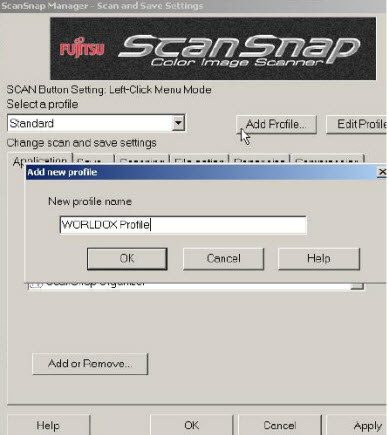
1. Right-click the ScanSnap icon in the taskbar and select the Scan Buttons Settings option.

2. Click the Add Profile button and give the new profile a name, such as Worldox Profile. Click OK to save the profile.
3. Click the Application tab and then click the Add or Remove button. When you see the Add or Remove application dialog click the Add button. Browse to your c:\Worldox folder. Select wdScanSave.exe. Type wdScanSave in the Application Name box and click OK. Close the Add or Remove application dialog.
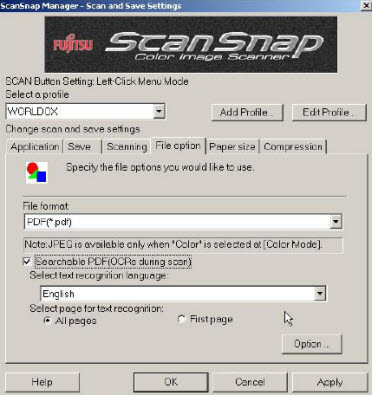
4. In the application tab, choose the application drop-down and select wdScanSave.

5. Switch to the File option tab. Select the PDF format file and check the Searchable PDF (OCRs During Scan) option if you want Worldox to be able to index the scan's content. Set any options on the remaining tabs as you think appropriate and click OK.
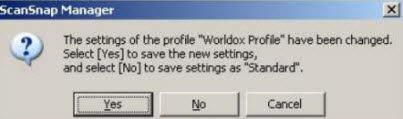
6. Click Yes when prompted to save the new profile settings for the profile Worldox Profile.
7. Select the Worldox profile in the drop-down list and click the Apply button.

8. That completes the installation and configuration. Whenever you scan something using the Scan button on the scanner, a Worldox profile dialog will pop up after the scan and optional OCR process has completed. When you have filled out the Worldox profile, the scanned document will be inserted into Worldox.
Note: For this to be the default behavior when you scan using the Scan button, you must also set the Use Quick Menu to be unchecked.